Bathroom renovation is a gratifying but challenging undertaking. A well-thought-out gut renovation is essential whether you are fixing damage, adding value to your house, or renovating for comfort. High-quality bathroom renovations that strike a mix between efficiency, style, and utility are our specialty at Voyager Construction. For a great bathroom makeover, adhere to this detailed guide.
Step 1: The Foundation for Success
-
Budgeting: Set Realistic Expectations:
Minor changes in a bathroom can cost $5,000, while a complete overhaul can cost more than $25,000. Divide your budget into the following important categories:
- Labor Costs: 40–60% of your budget may be spent on hiring experts to do electrical, plumbing, and tiling work.
- Materials & Fixtures: Durability and style should be taken into consideration while selecting tiles, vanities, toilets, tubs, and faucets.
- Unexpected Expenses: Budget 10–20% for unforeseen expenses like mould, water damage, or aged wiring.
Pro Tip: If you are on a tight budget, give priority to high-impact upgrades (such as a new shower and vanity) over purely aesthetic adjustments.
-
Layout & Design: Optimize Space & Functionality:
Choose whether to maintain the current layout or modify the layout to improve efficiency and flow:
- Keeping the Layout: You can save thousands of dollars on labor and materials by keeping your existing plumbing configuration.
- Changing the Layout: Installing a new shower, washbasin or toilet may require moving plumbing lines, which might cost $500 to $2,000 per fixture.
Important Design Considerations:
- Optimize Storage: Recessed shelving, built-in niches, and floating vanities all contribute to space savings.
- Accessibility: Upgrade your bathroom with grab bars, curbless showers and wider doorways.
- Lighting: Adding accent, vanity, and overhead lighting improves both atmosphere and use.
Pro Tip: Before beginning deconstruction, visualize your new bathroom using mood boards or 3D design tools.
-
Permits & Regulations: Avoid Legal Headaches:
Permits are needed for many renovations, particularly those that involve changing structural elements, plumbing, or electrical systems. Consult the building authority in your area for:
- Adherence to electrical and plumbing codes.
- Rules for waterproofing and ventilation.
- Inspection is necessary for structural alterations.
When selling your house, without obtaining the necessary licenses may lead to penalties, hold-ups, or other issues.
Pro Tip: Make sure contractors have the required licenses and pull the required permits before hiring them.
-
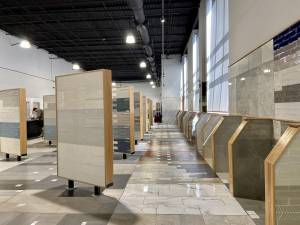
Choosing Materials: Durability Meets Aesthetics:
Bathrooms experience extremes in temperature and moisture, thus choosing long-lasting, water-resistant materials is essential:
- Flooring: Compared to vinyl or laminate, porcelain or ceramic tiles are more resilient to moisture and have a longer lifespan.
- Walls: Mould and damage are avoided by using waterproof cement board behind tiles.
- Vanity & Countertops: Solid surfaces and quartz are more resistant to moisture and stains than real stone.
- Fixtures: Choose Water Sense-certified toilets and faucets, which can save up to 30% on water usage without compromising functionality.
Pro Tip: Matte and textured finishes require less upkeep since they are better at hiding fingerprints and water stains than glossy surfaces.
Planning every aspect of the remodeling, including the budget, layout, materials, and permissions, in advance helps to avoid expensive errors and guarantees a stress-free experience. You can proceed to the next phase, demolition, as soon as you have a well-defined plan.
Step 2: Gutting Your Bathroom – A Safe & Efficient Demolition
The next step after deciding on a renovation plan is to completely demolish the bathroom in order to make place for the new design. During this stage, outmoded materials, flooring, plasterboard, and fixtures must be removed. A properly done demolition guarantees a safe and effective remodeling procedure and guards against structural harm to your house.
-
Turn Off Utilities – Avoid Water & Electrical Hazards:
In order to avoid gas leaks, flooding, or electrocution, utilities must be turned off. Here’s how:
- Water Supply: Turn off the main water valve or the shower, washbasin and toilet localized valves.
- Electricity: To prevent electrical shocks, turn off the bathroom’s power at the circuit breaker.
- Gas Lines (If Applicable): Disconnect any gas water heaters in your bathroom carefully and in accordance with local laws.
Pro Tip: To increase air circulation and minimize dust during demolition, open windows and turn on a ventilation fan.
-
Protect Surrounding Areas – Minimize Dust & Damage:
Because demolition is untidy, take precautions to keep debris contained and safeguard your house:
- Seal off the Space: To stop dust from spreading, cover doorways, air ducts, and vents with plastic sheeting.
- Use Floor Protection: To protect the floors outside the lavatory, place drop cloths or thick cardboard down.
- Put on protective gear: To protect yourself, put on knee pads, a dust mask, safety goggles, and heavy-duty gloves.
Pro Tip: To reduce disturbances, let your neighbors know about the renovation timetable if you live in an apartment or other shared housing.
-
Remove Fixtures & Fittings – Dismantling in Order:
Remove elements in the following order to guarantee a well-organized teardown:
- Toilet: After flushing to empty the tank and turning off the water supply, carefully unhook and remove it.
- Vanity & Washbasin: To avoid damage, disconnect the plumbing pipes before removing the countertop and vanity in pieces.
- Shower or bathtub: If removing a tub, cut through grout or sealant and unscrew the drain. It can take several persons or breaking it up into pieces to remove a cast-iron tub. When uninstalling a shower, pry off the tiles and shower panels after removing the glass doors.
- Flooring and Tiles: Old tiles can be removed with a power tool or a chisel and hammer. If you simply intend to replace the outer layer, be aware of the waterproofing membranes underneath.
Pro Tip: To prevent damage, carefully remove and store the toilet, vanity, and mirror if you intend to reuse them.
-
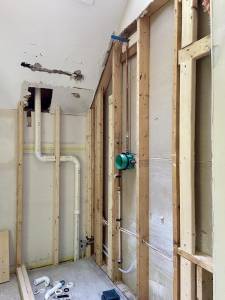
Tear Down Drywall (If Needed) – Inspect for Hidden Issues:
While plasterboard removal is not always required, it is advisable to take it down and start over if you see mould, water damage, or old electrical or plumbing wiring.
- Check for Moisture & Mold: Water damage is indicated by mushy plasterboard, dark patches or a musty odour. To avoid problems in the future, replace the impacted areas.
- Assess Plumbing & Wiring: Gutting the walls allows you to easily replace any pipes or electrical lines that require replacing.
- Remove Drywall in Panels: To make cleanup easier, remove the plasterboard from the panels by cutting along the studs with a utility knife and pry bar.
Pro Tip: To prevent running into pipes or live wires, use a stud finder before making any wall cuts.
-
Eco-Friendly Tip: Donate or Recycle Usable Fixtures:
Think about environmentally responsible disposal methods rather than disposing of things in a landfill:
- Donate: Charities such as Habitat for Humanity Restores can receive usable sinks, vanities, toilets, and fixtures.
- Recycle: Local recycling facilities can be used to repurpose scrap metal, old tiles and plasterboard.
- Repurpose: Wood cabinets can be refurbished and utilized in other areas of your house.
A carefully thought-out demolition guarantees that your refurbishment gets off to a good start. You may save time, cut down on waste, and avoid expensive errors by taking these precautions: shutting off utilities, safeguarding your house, removing fixtures cautiously, and properly disposing of things. Now that your bathroom has been prepared and deconstructed, you can begin creating the space of your dreams!
Step 3: Plumbing & Electrical Upgrades – The Backbone of a Functional Bathroom
The next step after remodeling your bathroom is to replace the electrical and plumbing systems to make sure they are up to code, more efficient, and safer. Investing in high-quality renovations now will save you time, money, and aggravation later on since outdated wiring and pipes can require expensive repairs later.
-
Plumbing Upgrades – Ensuring Leak-Free and Efficient Water Flow:
The plumbing system in your bathroom is essential for longevity, water pressure, and appropriate drainage. Here are some things to think about whether you are maintaining the current arrangement or moving the fixtures:
-
Reconfigure Plumbing for Optimal Functionality:
- Moving Fixtures? The water supply and drainage lines will need to be adjusted if you intend to move the washbasin, toilet or shower. To guarantee the right slope and pressure, professional knowledge is needed.
- Switch to copper or PEX pipes: Modern materials like copper or PEX (cross-linked polyethylene), which are more resilient to corrosion and more flexible, can be used to replace outdated galvanised pipes.
- Verify the water pressure: Installing a pressure-balancing valve can help maintain a constant water flow in your house if the water pressure is low, particularly when several fixtures are in use.
- Leak-Proof Installation: To avoid leaks and water damage, which may necessitate expensive structural repairs, make sure all pipe connections are adequately sealed.
Pro Tip: Install a low-flow showerhead and water-saving toilet to save water use by up to 30%, which will lower utility costs and encourage sustainability.
-
Electrical Upgrades – Safety, Efficiency & Modern Convenience:
Because of the growing demand for high-end fixtures, smart mirrors, lighting, and heated floors, modern bathrooms use more electricity than their predecessors. Enhancing the electrical system guarantees energy efficiency, safety, and adherence to building requirements.
-
Install GFCI Outlets – A Non-Negotiable Safety Feature:
- Why GFCI? Ground Fault Circuit Interrupter (GFCI) outlets instantly cut power when they detect a fault, preventing electrical shocks in damp locations.
- Placement Is Important: For added precaution, place GFCI outlets next to the vanity, sink and any other damp surfaces.
-
Upgrade Lighting for Ambiance & Energy Efficiency:
- Install LED Lighting: Energy-efficient LED lights, which use 75% less energy and last longer, can be used to replace old incandescent bulbs.
- Layered Lighting Design:
- Overhead Lighting: Offers general illumination, perfect for recessed lights or LED panels positioned on the ceiling.
- Task Lighting: To remove shadows when doing grooming chores, use vanity lights at eye level.
- Accent Lighting: To create a contemporary, spa-like atmosphere, place LED strips beneath vanities or around mirrors.
- Dimmer switches: These let you change the brightness for a more comfortable setting.
Pro Tip: Smart lighting systems or motion sensor lights can lower electricity costs while increasing convenience.
-
Ventilation Matters – Prevent Mold & Moisture Damage:
In order to avoid mould growth, peeling paint, and humidity-related problems, proper ventilation is crucial. To improve your ventilation system, follow these steps:
- Installing a High-Capacity Exhaust Fan: Depending on the size of your bathroom, pick a fan with the appropriate CFM (Cubic Feet per Minute) rating.
- Check the Ductwork: In order to avoid moisture accumulation, make sure the vent releases air outdoors rather than into the attic.
- Humidity Sensors: Take into account automated exhaust fans equipped with sensors that detect an increase in moisture.
Pro Tip: At this point, heated floors can be put for the utmost in luxury, increasing comfort and warmth while lowering the accumulation of moisture.
An essential investment that improves the usefulness, safety, and efficiency of your bathroom is updating the electrical and plumbing systems. Installing contemporary plumbing, secure outlets, energy-efficient lighting, and efficient ventilation results in a long-lasting, cozy area.
Now that the electrical and plumbing work is finished, you can proceed to Step 4: Selecting Finishes & Fixtures to realize your idea!
Step 4: Install Flooring, Walls, & Paint – Bringing Your Bathroom to Life
Once the electrical and plumbing systems have been upgraded, it is time to reconstruct your bathroom’s structure with long-lasting, moisture-resistant materials. This phase is essential because it lays the groundwork for a durable, mold-free, and fashionable area. In addition to improving appearance, choosing the right wall, flooring, and paint options will guarantee resistance to moisture, humidity, and normal wear and tear.
-
Walls – Moisture-Resistant Drywall for Longevity:
Because bathrooms have significant levels of moisture, utilizing regular plasterboard might eventually result in warping, mould and mildew. To build a solid and mold-proof foundation, use moisture-resistant plasterboard instead.
-
Types of Bathroom Drywall & Wall Materials:
- Green Board Drywall: For basic bathroom walls, green board plasterboard works best because it is water-resistant but not completely watertight.
- Cement Board (Backer Board): Because it is completely waterproof and inhibits the growth of mould, it is a necessary component behind tiled walls, showers, and bathtubs.
- Waterproof Wall Panels: Modern, seamless, low-maintenance panels that are extremely resistant to moisture are known as waterproof wall panels.
Pro Tip: To increase the endurance of drywall in damp places, use tape and mold-resistant joint compound while installing it.
-
Flooring – Choosing the Right Waterproof Material:
The flooring in your bathroom should match your design style and be easy to maintain, watertight, and non-slip.
-
The best flooring options for bathrooms are:
- Ceramic or porcelain tiles: incredibly resilient, water-resistant, and available in an endless array of styles.
- Luxury Vinyl Plank (LVP): Cost-effective, water-resistant, and emulative of genuine stone or wood.
- Natural stone (granite, marble, and slate): classy and classic, but needs to be sealed to stop water absorption.
- Engineered wood (with waterproof coating): Offers more water resistance together with a cozy, organic appearance.
-
Floor Installation Process:
- Prepare the Subfloor: Before placing materials, make sure the subfloor is dry, clean, and level.
- Install Underlayment: For additional moisture protection, cement board or a waterproof membrane can be used.
- Install tiles or planks: Use a high-quality adhesive, particularly in places with high moisture content, such as around sinks and showers.
- Grout & Seal: against stop moisture intrusion, apply grout and seal that is resistant against mould.
Design Tip: By reducing grout lines, large-format tiles visually enlarge a small bathroom and simplify cleaning.
-
Painting – The Final Touch for a Fresh Look:
Painting turns your bathroom into a light-filled, welcoming area after the walls and flooring are put in. Selecting the proper paint type is crucial for longevity and air quality because bathrooms are constantly damp.
-
Selecting the Best Paint for Your Bathroom:
- Moisture-Resistant Paint: Choose satin or semi-gloss finishes since they are easier to clean and more resilient to moisture.
- Low-VOC (Eco-Friendly) Paint: Creates a healthier atmosphere by lowering indoor air pollution.
- Mildew-Resistant Additives: To avoid mildew accumulation, certain paints use anti-mold chemicals.
-
Paint Color & Design Insights:
- Dark Colors: Deep blues, charcoals, or forest greens give drama and refinement.
- Light Colors: Pastel colors, soft whites, or gentle grays make small bathrooms feel bigger and more airy.
- Accent Walls: For a chic contrast, think about applying wallpaper or painting one wall a more striking color.
Pro Tip: Make sure there is enough lighting if you are using dark colors to avoid making the room feel too small.
For a bathroom to be both aesthetically pleasing and moisture-resistant, the proper wall, flooring, and paint installation are essential. You may create a place that is both aesthetically pleasing and functional by selecting long-lasting, waterproof materials and well-chosen colour palettes.
Now that you have these fundamental components in place, you can go on to Step 5: Installing Fixtures & Amenities to realize your ideal bathroom!
Step 5: Install Fixtures & Finishing Touches – Bringing Your Bathroom to Life
It is time to finish your bathroom makeover by adding fixtures, fittings and décor after the walls have been painted and the flooring put in place. In this step, function and style come together to create a bathroom that is useful, aesthetically pleasing, and customized to your requirements.

-
Vanity & Sink – A Balance of Storage & Style:
The bathroom’s focal point, the vanity and washbasin, affects both appearance and usability. Think about materials, storage requirements, and dimensions while selecting the best one.
-
Best Vanity & Sink Options for Your Bathroom:
- Wall-mounted (floating) vanities are perfect for little bathrooms because they give the impression of more space while making floor cleaning simple.
- Freestanding Vanities: Ideal for larger bathrooms, these vanities offer plenty of storage with drawers and cupboards.
- Pedestal Sinks: A stylish and compact choice for traditional or minimalist designs, these sinks provide little to no storage.
- Vessel Sinks: These sleek, contemporary sinks add a posh appearance when placed atop a vanity.
Pro Tip: To avoid moisture damage over time, select materials that are resistant to moisture, such as solid wood with a protective seal, granite, or quartz.
-
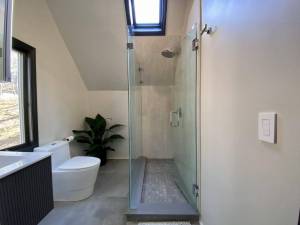
Shower & Tub – Combining Comfort & Elegance:
Your own preferences and available space will determine whatever shower or bathtub you choose.
-
Modern Shower & Tub Options:
- Walk-in Showers: Ideal for modern bathrooms, these showers are roomy, accessible, and contemporary.
- Frameless glass enclosures improve light flow and provide the impression of being sleek and open.
- Freestanding Tubs: A striking feature that creates an opulent, spa-like atmosphere. 🛁 Shower-Tub Combo: Perfect for smaller bathrooms, offering flexibility for a range of tastes.
Expert Advice: For an opulent, spa-like experience, install a handheld sprayer and rainfall showerhead.
-
Lighting & Mirrors – Elevating Functionality & Ambiance:
Your bathroom’s appearance and functionality can be significantly improved with the right mirrors and lighting.
-
Layered Lighting Strategy:
- Ambient Lighting: Use recessed lighting or overhead ceiling lights to uniformly light the entire area.
- Task Lighting: Reducing shadows around the mirror with wall-mounted sconces or LED strips for grooming.
- Accent Lighting: Adding warmth and sophistication with under-cabinet lighting or backlit mirrors.
-
The Greatest Bathroom Mirror Options:
- Frameless Mirrors: Sleek and minimalist, ideal for contemporary design.
- Backlit LED Mirrors: Offer uniform illumination for grooming and makeup.
- Large mirrors: They help create the illusion of more visual space in compact restrooms.
Pro Tip: Use dimmable lights to change the atmosphere from one of rest to one of energy.
-
Smart Home Add-Ons – Boosting Comfort & Efficiency:
Your bathroom can become more opulent, energy-efficient, and handy by using smart technology.
-
The best smart bathroom features are:
- Motion-Sensor Faucets: They save water and encourage cleanliness. Particularly in the winter, heated floors keep feet toasty.
- Smart toilets: Advanced comfort is enhanced by features like seat warmers, automatic flushing, and bidets.
- Bluetooth shower speakers: As you get ready, listen to music or podcasts.
Pro Tip: For personalized settings and energy efficiency, a lot of smart gadgets may be operated using Smartphone apps.
-
The Last Step: Examine and Have Fun!
Make sure everything is installed and working correctly before declaring the renovation finished:
- Inspect the toilet, shower and washbasin for leaks and plumbing problems.
- Verify the lighting fixtures’ location and brightness.
- Make sure that the caulking and sealing around fixtures are completely waterproof.
- Give your bathroom a thorough cleaning, then take a moment to appreciate how much it has changed!
The last step in designing a bathroom that is both practical and fashionable is installing fixtures, lighting, and smart features. Choosing premium materials, cutting-edge designs, and effective technology will ensure that your home remains cozy, useful, and aesthetically pleasing for many years to come.
It is time to unwind and relish your newly created bathroom haven!
Why Choose Voyager Construction for Your Bathroom Renovation?
High-quality bathroom remodeling that fits your style and budget is our specialty at Voyager Construction.
-
Our group guarantees:
- Skilled craftsmanship – accurate, superior remodeling.
- Eco-Friendly Solutions: Water-saving features and sustainable materials.
- Completing tasks on time and within budget No surprises—just flawless performance.
Conclusion
Thorough preparation, perseverance, and hard work are necessary for a bathroom’s successful gutting and renovation. These techniques can help you turn your antiquated bathroom into a chic and useful area that raises the value of your house. Careful execution will guarantee a long-lasting and satisfying renovation, whether you want to DIY or employ specialists.
